ALL OF MY CARD CREATIONS ARE NOW AVAILABLE FOR PURCHASE LORRAINE

Wednesday, December 30, 2009

DESIGNER'S CALENDAR-MARCH


Hello Scrappers!

I'm posting this project a little late this evening because I have been trying to learn how to use my new FLIP video camera that I got from my husband for Christmas. I hope to have a video for you on my next calendar page which will be April. I did a trial video, and I give high praise to all who make videos. It looks so easy until it's my turn to make one. My, I didn't know.... Is that what I sound like??

March calendar is done! I used 12"x12" card stock by DCWV "The Sweet Stack", that I purchased at Joann's Arts and Crafts. I cut the Script feature for the frame on page 47. Here are a list of the cuts that I used for the large calendar.


  1. 12"x12" card stock


  2. Frame Script-cut at 5-1/2"


  3. Boxed Rectangle-cut at 2-1/4"(pg 47)


  4. White card stock for Boxed Rectangle-1-1/2"x4". Cut with your paper cutter.


  5. March-1-1/4"(boxed feature pg.30)


  6. Days of the week-cut at 3/4"


  7. Days of the week shadow-cut at 3/4"


  8. Kite-cut at 4"


  9. Kite Shadow-cut at 4"


  10. Numbers-cut at 1/2"


Designer's CD Mini Calendar

  1. Base-4-5/8"x5-3/8"

  2. Frame Script Feature-3-1/2"

  3. March-3/4"

  4. Numbers-1/2"

  5. Kite-cut at 1-1/2"

  6. Shadow-cut 1-1/2"
MINI CD CALENDAR


Tuesday, December 29, 2009

DESIGNER'S CALENDAR-FEBRUARY


Hello Scrappers! I have February's Calendar sets ready for you to make. On my first post(which was "January") I have given the basic instructions for the 12"x12" calendar and the basics for the CD case desk top calendar. I will however give the size of fonts and numbers. On the large calendar I will always use a 12"x12" card stock for my base. The size of the calendar frame will change but I will post those dimensions.


LARGE CALENDAR INSTRUCTIONS


  1. 12"x12" Card stock

  2. Frame cut at 5-1/2"

  3. February cut at 1-1/2"

  4. Days of the week-cut at 3/4"

  5. Numbers-cut at 1/2"

  6. Hearts-cut 1 at 1/2",1 at 1"

MINI CD CALENDAR


  1. Hearts-cut 2 at 1"

  2. Numbers-1/2"

  3. Base 4-5/8"x5-3/8"(cut this with your paper cutter)

  4. Calendar Frame-cut at 3-1/2"

  5. February-3/4"


Monday, December 28, 2009

DESIGNER'S CALENDAR-JANUARY

Hello Scrappers,


I finally have some time to make a new project with my new Designer's Calendar Cricut Cartridge. In the next couple of weeks I will feature all twelve months with a desk top calendar to match. For the month of January, I wanted to keep it simple, and just added some brads and prima flower for embellishment. The desk top calendar is inserted into a CD case. I plan to store all twelve in the case so that it will be easy to display the next month. I thought that was a great way to keep them all together and be able to display it on a small easel on my desk.


LARGE CALENDAR INSTRUCTIONS

The calendar frame is cut on "fit to page" on a 12"x 12" white card stock(pg 47 in the handbook). You will get an 8-1/2" calendar frame. Adhere the frame to a 12"x12" red card stock. January is on page 28 of the handbook and I used the BOXED feature at 2-1/4". All of the numbers are cut out of black card stock at 3/4". The frame for the month is cut out of black card stock at 3"x 11" and layer a 2-1/2" x10-1/2" white card stock on top of the black. I used my ZIG two way glue pen to adhere the month to the white card stock. I added black brads to the four corners of the title and added some prima flowers.


DESK TOP CD CALENDAR


  1. Base-White card stock cut at 4-5/8"x5-3/8"

  2. Layer-Red card stock cut at 3-1/2" using the shadow feature on page 47

  3. Calendar frame-white card stock cut at 3-1/2" page 47

  4. Numbers-black card stock cut at 1/2"

  5. January-white card stock cut at 3/4"

  6. January shadow-black card stock cut at 3-1/2"


  7. Refer to the small calendar photo for assembling the calendar.

Monday, December 21, 2009

A BIG THANK YOU!

Hello Scrappers!
I would like to thank every one for making my blog so much fun for me. I started this blog November the 18th 2009, and have had so many visitor in such a short time. I would also like to thank every one of my followers. I get so thrilled to see your name or picture on the side bar. I hope to bring you some new ideas in the coming new year. One day I plan to try my hand at making a video too. Once again, thank you to everyone for visiting!

Lorraine

Saturday, December 19, 2009

Adhesive Eraser-Tool of The Week

Hello Scrappers.
Since we are all so crazy about Scrapbooking, you must own this eraser. It will remove most permanent adhesive off of delicate card stock, and photos without leaving a mark. When I use my ATG sometimes I go beyond the edge of card stock with my tape. Once I apply it to my project, I will run the eraser on the edge and remove the excess. This product can be found at walmart.com. Here is the link.
http://www.walmart.com/catalog/product.do?product_id=10285236&sourceid2318711835090412908
You may have to copy and paste the link. For some reason the website address(URL) has been split.

Friday, December 18, 2009

Sweet Candy Tri-Fold Card


Hello Scrappers! I had this candy cane ribbon that I just had to use. Here is a Tri-Fold Card with the candy cut using JOYS OF THE SEASON Cricut Cartridge page 47. A tutorial on how to make a Tri-Fold Card can be found on the side bar under November. Click on that and scroll down the page and you will find the instructions for an earlier card I made.


Thursday, December 17, 2009

The Meaning Of Christmas Pop-Up Cards


Hello Scrappers, I had two more cards to make for friends using the pop-up design. The first card I used a stamp set by INDADINKADOO. I purchased the stamp set at Michael's. I do have a tutorial for the basic card on my blog under Winter Woodland Pop-Up Card.

The card with the Angel was cut using the Christmas Noel Solutions Cartridge. The large Angel was cut at 4", and the smaller Angel at
2-1/2". The Peace tag I cut from JOYS OF THE SEASON CRICUT CARTRIDGE PAGE 77 at 3/4"

Wednesday, December 16, 2009

Hanging Christmas Ornaments Card


Hello Scrappers! I wanted to design a card with decorations on the outside and inside. So I decided to make the ornaments be the inside and outside of the card. When you open the upper flap there is still room for a message.

The card base is cut at 6"x 5-1/2". Score at 4-1/4" at the 6" mark. I rounded the corners of the top flap and lined it with Christmas card stock and ribbon. The ornaments were cut from the JOYS OF THE SEASON Cricut Cartridge. Since the ornaments were different shapes I had to cut each one at a different size. The round ornament was cut at 2-1/4". The center ornament was cut at 2-1/2" and the one on the far right was cut at 2-1/4". I added pop dots to the back of each ornament and attached them to the card stock that I cut 1/4" smaller than the card. I then used embroidery thread, and threaded each ornament and taped the ends to the back of the green card stock. Adhere the green card stock to the card. On the inside flap I cut a small piece of white card stock and inked the edges. This will be where I will write my message.


Monday, December 14, 2009

Dripping Candle with Pine Cones


Hello scrappers! Today's card is cut from the JOYS OF THE SEASON Cricut Cartridge. I cut it at 4" which is on page 55. I ran it through the cuttle bug Divine Swirls folder. I added copper glitter to the pine cones. They can be found on page 67. Last year we were crazy for the Martha Stewart leaf punch. I still enjoy using it, and added a few branches. I cut the candle holder twice, and added pop-dots between the two layers. It made it a little easier to add the branches between the layers. Pop-dots were also added behind the candle.

Saturday, December 12, 2009

Versa Marker Water Mark Pen


Hello Scrappers! I'm so excited to share this new tool for this week! I have gone crazy using the VersaMark Pen. Use the Watermark Pen for outlining or signing your name or even writing a secret message. The VersaMarker can be used for all the techniques the VersaMark pad can. The pen is double ended with a fine tip, and a larger tip on the other side. I signed my name on a few of my cards, and then heat embossed it. I just love it!

Friday, December 11, 2009

Christmas Card Using Wild Card Cricut Cartridge


I did not realize that the Wild Card Cartridge had a Christmas card and envelope. It is on page 74. I cut the card and envelope at 4-1/4" . I cut a piece of red card stock to go behind the tree so that it would out line the tree. Rhinestones were added to decorate the tree, and I used gold glitter for the star. For the ornament I used holographic paper. I like shinny!

Thursday, December 10, 2009

Joy Card with Silver Card Stock


This monochromatic card was done in all silver. The glittery card stock is from Ann Griffin Christmas Collection. The chipboard letters, ribbon and card stock were purchased at Michael's. I added a bow charm that I found in my stash. Another simple card that only took a few items to make.

Wednesday, December 9, 2009

Snow Flake Card


I finally got a package in the mail, it's my new Cricut Cartridge WHEN IT'S COLD OUTSIDE! I wanted to make a card that only took three items to make. I used card stock, ribbon and stickles. I did run the white card stock through the CUTTLE BUG using the Holly Ribbons folder. I guess technically this could be considered another item. I just love the green on white, and the sparkly stickles. If you click on the picture you can get a better look at the details.

Tuesday, December 8, 2009

Gingerbread Man Card


This card is just so darn cute!!! He looks good enough to eat! I cut the gingerbread man out of white chipboard. Then I traced the cut on a piece of thin cork board, and glued the two together. I did try to cut the cork board with my Expression, but was unsuccessful. You can find this cute little guy, and the sentiment from STRETCH YOUR IMAGINATION. I ran the red card stock through the Cuttle Bug using the Perfectly Paisley Folder. The ribbon I purchased at Michael's, along with the rhinestones.

Text In A Circle

MICROSOFT WORD (2000 9.0.2720) TEXT IN A CIRCLE

Click on the “Insert Word Art” Icon
Click on the shape that looks like an arch.
Type in the text that you would like.
Click OK.
This will display it in your document. Your tool bar for "WORD ART"
should be visible when you click on your image.
On the tool bar there is an “ABC” Icon (when the cursor in on it) it
Should read “WORD ART SHAPE”
Click on this. There are several different shapes. Click on the one that
Looks like the letter “O”. When you do this, the image will look
out of shape. Re size it by using the toggles to reshape the image.

If you need further help, please let me know and I will do what
I can to make this work for you.

Monday, December 7, 2009

Winter Woodland Pop Up Card

This is such a fun card! I seem to say that a lot! How nice and compact the card is when folded. Have fun decorating it for Christmas, or even for a birthday with a cake and balloons! I cut the house from Winter Woodland Cricut Cartridge. Here are step-by-step instructions.


Cut card stock at 4-1/4"x 11". Score at 1", 2-3/4", 3-3/4,and 5-1/2". Rotate card and score at the same intervals. On the center score line cut a slit from the 1/2" mark on your cutter to the 3-1/2" mark. Fold all score lines in one direction.
Cut a piece of card stock that Measures 3"x5-1/2". This will be the pop-up portion of the card. If you would like to add a second layer to the rectangle, this will need to be done at this point.

To attach the rectangle piece, insert it through the slit on the top of the base. Turn the card over and fold the top flap down. Line up the edge of the rectangle piece with the edge of the card. Add adhesive no wider than an inch thick to the rectangle. Fold down the other flap at the bottom of the card. Bring the card up to the top and adhere. Line everything up together. Turn card over and repeat using the adhesive.


Slide the base along the rectangle piece, and your card should now stand freely. Now that the base is complete, you may add your printed paper and embellishments.
If you need further instructions, please feel free to leave a comment. I will be happy to answer any questions. Thank you, Lorraine

Saturday, December 5, 2009

ATG714 Tape Dispenser


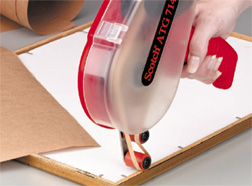
I love my ATG tape dispenser. This holds 1/4" tape width, and 36 yards in length. That is a lot of tape! The Scotch ATG 714 Adhesive Applicator Gun is perfect for all of your scrapbooking and paper projects. The tape is acid free to protect your photos. I purchased my gun from Armel.com. but unfortunately they seem to have gone out of business. Try shopping the web for price comparison. I purchased my gun for around $45.00. Try http://www.framingsupplies.com/3M/TapeDispenserGuns.htm You can find the tape (12 roll pack) for two dollars each at http://www.thetapedepot.com/cart/component/option,com_frontpage/Itemid,1/ I have not ordered from them before, but after a little blog talk on the Cricut Message Board, it looks like the majority of scrappers buy their tape from The Tape Depot. I just ran out of my last purchase from Armel, but will plan to place an order from them soon.

Friday, December 4, 2009

Japanese Tri-Shutter Card

I purchased these adorable Japanese stamps by Hero Arts. This was a perfect design for my Daughter's birthday. This style of card is so fun to design, and produces a card that will stand up to display. Give it a try!


Thursday, December 3, 2009

Top Note Swing Card

I recently purchased the Top Note Die from Stampin' Up, and made a Christmas card. To make this card you will need to cut two in red card stock, and two in black. I did trim the the black just inside the stitch line in order for the stitching to show when I adhered the black to the red portion. I decorated the front of the card using the Cricut Christmas Noel Solutions cartridge, then I stamped the inside of the card with a stamp from Hero Arts. In order to attach the two sections together, I used a brad at the upper left hand corner. This will allow the card to swing open.


Wednesday, December 2, 2009

Poinsettia Flower Pot Card


POINSETTIA FLOWER POT CARD

I think I'm hooked on this style of card again! I Love this flower pot. This is definitely a versatile base for all occasions. I am not the original designer of this style of card. I did see it posted on the Cricut MB, and this is my design based on the original. I would like to give credit to the original designer, but I don't know who that is. I used Winter Woodland Cartridge for the flowers. Joys of the Season Cricut Cartridge also has a poinsettia (pg. 69). Well lets get started making this card!


CARD BASE

Cut card stock at 3-1/2" x 9". Score at 2" and 5-1/2". Fold at score lines having the 2" flap facing the front of the card.


Cut a small angled section off both sides of the card. This will give it the flower pot shape.


Cut a piece of green card stock at 4-1/2"x2-1/2". Cut a 2-1/4"x4-14" in red. Adhere the red piece on top of the green card stock. I then cut a piece of red card stock to add to the top flap of the card. My paper was not double sided and I wanted a solid color for the pot rim. I used the Snow Flurry punch by Martha Stewart at the edge of the pot rim. I added a 1" strip of white card stock and glued it to the backside. This made the snowflakes really show up. Add some ribbon and tie in a bow. Adding pop dots to the underside of the rim will give the card some dimension. On the inside of the card, run adhesive no wider than 1/4" width on the outer edge of the card. Close your card to tape together. The card should now have a pocket wide enough for your card insert to fit.


This is what your card should look like at this point.


Insert your rectangle card into the pot. This will make it easier to determine the placement of your poinsettias. I used the Winter Woodland cartridge to cut my flowers at 2-1/2"(page 40).

Two flowers were cut for each poinsettia. Adhere the first flower to the leaves. I coated the second flower in versa mark, and added embossing powder. Heat set your powder. If you miss a spot, and the embossing powder did not cover completely, you can coat the section in versa mark again, and add embossing powder a second time, and heat again. This gives the flowers a nice glossy finish.
Place the flowers on the rectangle portion of the card using pop-dots. Make sure you do not put pop-dots on the flower pot. If you do your card will not open.

I hope you have fun making is card. I have so many ideas in my head for Christmas themed flower pot cards. Try using holly leaves. There are so many winter greens that would look great trailing down the pot. Have fun!!!

Tuesday, December 1, 2009

Christmas Stocking-"Flower Pot Style"

I was inspired by the Flower Pot style cards we all made this past summer. I decided to cut two stockings from the Christmas Cheer Cricut Cartridge, and I adhered the stockings together. I left a pocket in the top portion to allow the card to slide in and out. This would be fun to add candy or even toys to the removable portion!


Monday, November 30, 2009

Lion Card


Here is another card that would be appropriate for a guy. I have been trying to make a few cards designed for a man. This would make a nice card for a Birthday or even a Thinking of you card for your guy.